Sunday, 19 January 2020

jQuery introduction


jQuery | Introduction

jQuery is an open source JavaScript library that simplifies the interactions between an HTML/CSS document, or more precisely the Document Object Model (DOM), and JavaScript.
Elaborating the terms, jQuery simplifies HTML document traversing and manipulation, browser event handling, DOM animations, Ajax interactions, and cross-browser JavaScript development.
Note: The only library available today that meets the needs of both designer types and programmer types is jQuery.
Why jQuery?
Some of the key points which supports the answer for why to use jQuery:
  • It is incredibly popular, which is to say it has a large community of users and a healthy amount of contributors who participate as developers and evangelists.
  • It normalizes the differences between web browsers so that you don’t have to.
  • It is intentionally a lightweight footprint with a simple yet clever plugin architecture.
  • Its repository of plugins is vast and has seen steady growth since jQuery’s release.
  • Its API is fully documented, including inline code examples, which in the world of JavaScript libraries is a luxury. Heck, any documentation at all was a luxury for years.
  • It is friendly, which is to say it provides helpful ways to avoid conflicts with other JavaScript libraries.
jQuery is widely famous with its philosophy of “Write less, do more.” This philosophy can be further elaborated as three concepts:


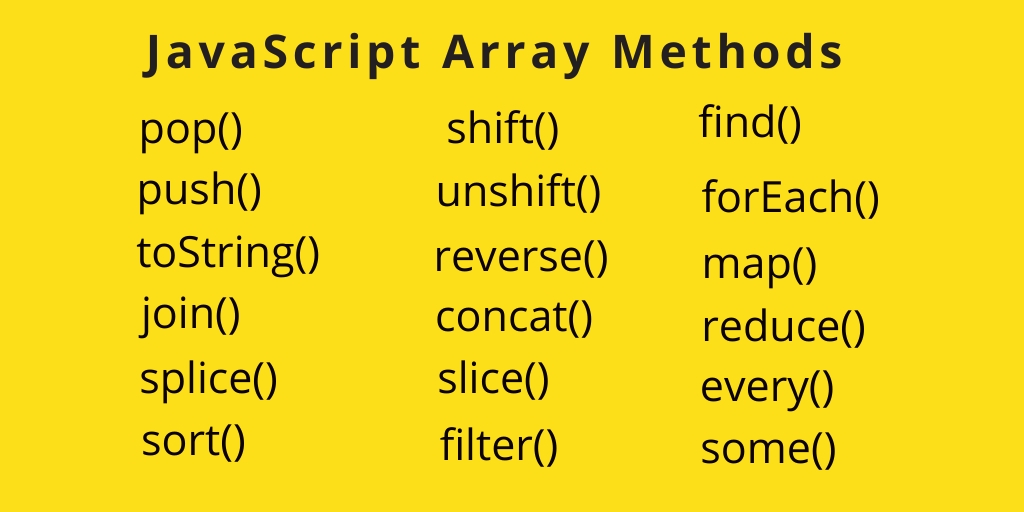
  • Finding some elements (via CSS selectors) and doing something with them (via jQuery methods) i.e. locate a set of elements in the DOM, and then do something with that set of elements.
  • Chaining multiple jQuery methods on a set of elements
  • Using the jQuery wrapper and implicit iteration
Using jQuery (JS) library on HTML page
There are several ways to start using jQuery on your web site.
  1. Use the Google-hosted/ Microsoft-hosted content delivery network (CDN) to include a version of jQuery.
  2. Download own version of jQuery from jQuery.com and host it on own server or local filesystem.
Note:All jQuery methods are inside a document ready event to prevent any jQuery code from running before the document is finished loading (is ready).

Basic syntax for any jQuery function is:
$(selector).action()
  • A $ sign is to define/access jQuery
  • A (selector) is to “query (or find)” HTML elements in html page
  • A jQuery action() is the action to be performed on the selected element(s)
Example:
filter_none

brightness_4
$(document).ready(function(){
      $("button").click(function(){
           $(".gfg").hide();
      };)
});
This example explain a case where a user clicks on a button and the elements with class = “gfg” will be hidden as an effect of that.
Advantages:
  • Wide range of plug-ins. jQuery allows developers to create plug-ins on top of the JavaScript library.
  • Large development community
  • It has a good and comprehensive documentation
  • It is a lot more easy to use compared to standard javascript and other javascript libraries.
  • JQuery lets users develop Ajax templates with ease, Ajax enables a sleeker interface where actions can be performed on pages without requiring the entire page to be reloaded.
  • Being Light weight and a powerful chaining capabilities makes jQuery more strong.
Disadvantages:
  • While JQuery has an impressive library in terms of quantity, depending on how much customization you require on your website, functionality maybe limited thus using raw javascript maybe inevitable in some cases.
  • The JQuery javascript file is required to run JQuery commands, while the size of this file is relatively small (25-100KB depending on server), it is still a strain on the client computer and maybe your web server as well if you intend to host the JQuery script on your own web server.
This text is taken from GeeksforGeeks

JSON introduction

JSON: JavaScript Object Notation.
JSON is a syntax for storing and exchanging data.
JSON is text, written with JavaScript object notation.
 

Exchanging Data

When exchanging data between a browser and a server, the data can only be text.
JSON is text, and we can convert any JavaScript object into JSON, and send JSON to the server.
We can also convert any JSON received from the server into JavaScript objects.
This way we can work with the data as JavaScript objects, with no complicated parsing and translations.

Sending Data

If you have data stored in a JavaScript object, you can convert the object into JSON, and send it to a server:


What is JSON?

  • JSON stands for JavaScript Object Notation
  • JSON is a lightweight data-interchange format
  • JSON is "self-describing" and easy to understand
  • JSON is language independent *
*
JSON uses JavaScript syntax, but the JSON format is text only.
Text can be read and used as a data format by any programming language.
The JSON format was originally specified by Douglas Crockford.

Why use JSON?

Since the JSON format is text only, it can easily be sent to and from a server, and used as a data format by any programming language.
JavaScript has a built in function to convert a string, written in JSON format, into native JavaScript objects:
JSON.parse()
So, if you receive data from a server, in JSON format, you can use it like any other JavaScript object.

thank you w3schools.com

Arrays in Javascript

Hello everyone today in this post I like to share with you about Arrays in Javascript.

Variables help us to store single value but array is a variable that stores multiple values.
An array is a special variable, which can hold more than one value at a time.
If you have a list of items (a list of car names, for example), storing the cars in single variables could look like this:
var car1 = "Saab";
var car2 = "Volvo";
var car3 = "BMW";
However, what if you want to loop through the cars and find a specific one? And what if you had not 3 cars, but 300?
The solution is an array!
An array can hold many values under a single name, and you can access the values by referring to an index number.
 it is described in w3schools.com about arrays
In JavaScript we use squarebraces to declare as array
 var arrayName = [value1, value2, ...];
We use index to point out a specific value in array.
The index starts from 0 and continue 1, 2, 3 and respectivly.

There are many methods to use in array.
here are some lists of arrays method.

Functions in JavaScript

Here in this post we are going to see what is a function and how to write function in Javascript.
In Javascript function plays a major role. So it is important to understand how to write functions.Function is a collection of statements that do a specific task.
Writing a function.
we start the function with the keyword function. and continued with the function name. And then we have to pass parameters in parenthesis.
Parameter means the variables that are going to be used in the function. After that we have to start a curly braces  to start our statements to do. Then a returning value. This value will be returned by the function.
Here is a sample function

function functionName (variablesToUse. InTheFunction){
      //the codes and statments to exectue
}

Now lets make a function to add two numbers

function addNum (num1, num2){
  return num1 + num2
}

There is another way of writing function that method is known as arrow function method

Arrow functions were introduced in ES6.
Arrow functions allow us to write shorter function syntax:

here it is normal function
hello = function() {
  return "Hello World!";
}  


here it is with arrow function
hello = () => {
  return "Hello World!";
}  


For more about arrow function feel free to check here.
 

Wednesday, 15 January 2020

Bootstrap the framework of CSS

Hello everyone, 
In this post I like to share about bootstrap. As we know how to write html and css we can easily handle bootstrap. To understand bootstrap we can think like a external style sheet already designed for us.
Yes They had designed unique and simple designs to all the elements and also they gave us the classes only to apply in specific place.
Lets understand how easy is to use bootstrap insted of hard code(code everything by typing).

Lets say like this we have designed a website having three paragraph elements. for the first element we like to apply padding and for the secound one we like to apply padding little biggerthan first paragraph and for the third one we like to remove margin and padding.
So here we have to give all the three paragraphs different classes and then go to the external stylesheet and then we have to write for every classes padding 1rem for the first paragraph padding 1.2em for secound paragraph and for the third we have to write padding 0 and margin 0.
But if we use bootstrap we can easily apply p-1 class for paragraph one p-2 class for paragraph 2 and p-0, m-0 to paragraph 3. That is this much simple to write code. You can save time in typing and spend it in designing or thinking of the layout.
For bootstrap we have to know some words to remember for example p for padding and 0 to 5 according to the size of it.
But also bootstrap gives us special and easy to remember names. Lets take this example, if we want to apply margin left  we can use 'm' for margin and 'l' for left and then number for the size. For standared size we can apply ml-2 in the elements class.
These are very simple methods they also offer us nav bar carosals cards and many much more to explore them just click here.

Tuesday, 14 January 2020

Responsive design using css

Nice to see you in another post.
In this post I like to discus some of the techniques we can use to design a responsive website using css.
Although technology is growing much we should adopt to it so that we can survive. I understand it is not the time for motivation.
The think I like to discuss in this post is how to design our site responsive.
got it from bluecorona.com

What is responsive?

When we design our site using our computer. Normally we check the site in computer only and in maximized window. But when it comes to user they could use it in their smart phones or in some other devices, some times they could visit our site using minimized browsers window.
CSS3 carries many new features for it. But here I like to share some techniques to use to make our site responsive.

Percentage

We can add percentage to design a responsive site. If our nav bar should be fill the view port we can add naves bar width as 100% instead of giving it in pixels. so that you will get a responsive design.

vh and vw

Although percentage is working it is not fulfilling the exact purpose. So we can use vh and vw. vh and vw refers view port height and view port width respectively. Same like 100 vw means full view port and 50 vh means half of view ports height. If view ports width is 110px 1vw is 1.1px.
The percentage acts from its parent element. but vh or vw acts its full view ports size.

em and rem

em is specially used to define font size. with the root font size it will select its own size. for example if we fixed it with px or pt we may not change it responsive but if we give it with em or rem it will automatically adjust it according to the device we use. To read more click here

Box model in CSS

In this post I like to discuss about box model in CSS.
As I was designing the page i got to know that understanding box model will be very much helpful for us to disign the sites responsibly. So here I like to discuss about it.
what is box model?
In html every elements are taken by computer as box. For example if we made a paragraph computer read it and show to us as a box. You can clearly understand about it by seeing the following image.
Thank you w3Bits.com
The width and height properties in css refers to the elements width and height.
Next padding, It is the space within the element and border.
The border is a line drawn after padding.
The other thing is margin, It is the space out side border to the other element.

To decorate any element we should know all of this things.
Hope you have understood the basics of box model. Happy coding :)..

Tuesday, 7 January 2020

Properties of Css

Hi,
In this post I like to share the main properties to get to know to add styles.  You can add specific value to this properties to style your website

CSS Background

CSS background property is used to define the background effects on element. There are 5 CSS background properties that affects the HTML elements:
  1. background-color
  2. background-image
  3. background-repeat
  4. background-attachment
  5. background-position

CSS Border

The CSS border is a shorthand property used to set the border on an element.
The CSS border properties are use to specify the style, color and size of the border of an element. The CSS border properties are given below
  • border-style
  • border-color
  • border-width
  • border-radius

CSS Font

CSS Font property is used to control the look of texts. By the use of CSS font property you can change the text size, color, style and more. You have already studied how to make text bold or underlined. Here, you will also know how to resize your font using percentage.
These are some important font attributes:
  1. CSS Font color: This property is used to change the color of the text. (standalone attribute)
  2. CSS Font family: This property is used to change the face of the font.
  3. CSS Font size: This property is used to increase or decrease the size of the font.
  4. CSS Font style: This property is used to make the font bold, italic or oblique.
  5. CSS Font variant: This property creates a small-caps effect.
  6. CSS Font weight: This property is used to increase or decrease the boldness and lightness of the font. 

Here I listed only few...  You can click here to learn css much more...


Introduction to CSS

Hello,
 This is my first post this  year, 
Today I like to share about the language of CSS.

What is CSS?

CSS is a simple language designed to give some beauty to the webpage by applying some syles. It is also known as cascading style sheet. This is a simple and easy to learn and use language.
How to write css?
Although we have learned to write html.
Here I like to share how to write css. First of all we should point out the element what should be decorated. For example we like to decorate the heading of the page and like to change its colour as blue.
So we want to decorate the element h1, which is heading one. 
Now we should select what is the change we like to do. From the above target we have to change the colour of h1.
At last what is our preference to apply in the element as the change.
As in the above example our preference is blue to apply as the colour of the h1 element.

Now we see how to solve our target with CSS.
Element{change : preference}
Its that simple to write css.

Where to write?

We can add CSS in three places.
The first one is inline. It is a method to write css as an attribute. For example 
In H1 tag, in style attribute we can add css...
inline css

The second method is known as internal css. This is to add within head tag. for that we will add style tag type our codes within them.

internal css
 The third method is to add css is external css. For this we make a file with the extension css for eg:- style.css.
Then we have to add/ link the file with the working html file.
External css
In the above image in line 6 it shows how to link the css file to the html file.
In the style.css file you can just started to type the css.


Like this you can add styles to your html elements.
Happy coding